Hello!
I just wanted to mention I put up a new poll! You can vote for as many things as you want.(multiple choice)
~~Ponytails

Monday, May 31, 2010
Features on My Blog
Hello!
I have been tinkering with which way I like my blog best since I started this blog in March and so, I thought I would show you all the things you can do on my blog on the side bar beginning at the top.
-You can get a blog button for your blog if you were featured on Terrific Thrifty Thursday or if you just like my blog. If you want a blog button, scroll down the page to my labels and click blog buttons.
-You can read about me on my blogger profile. And the other blog I sometimes post at.
-You can look at my Yahoo avatar and click on it if you have Yahoo Mail and customise your own avatar.
- Every single post is archived so if you want to look at other posts you can.
- You can look at my labels and pick one. For example, if you are only looking for clothes for dolls than you click on the clothes for dolls label and you get every post about clothes for dolls.
- You can feed and brush my pet guinea pig, Butterscotch! Don't forget to turn up the sound Butterscotch squeaks! I made him from bunnyherolabs.com and you can adopt your very own virtual pet for your own blog or just save them in your favourites.(they even have llamas!)
- If you want to see how many people visit My Passions for Fashions each day than you can click on the s
Sitemeter button and take a look.
- If you like my blog than you can follow it!
- And near the bottom are all the blogs that have featured me! If you have featured me please let me know so I can take your blog button or mention you on my blog.
- There is also a list of link partys to go to!

I have been tinkering with which way I like my blog best since I started this blog in March and so, I thought I would show you all the things you can do on my blog on the side bar beginning at the top.
-You can get a blog button for your blog if you were featured on Terrific Thrifty Thursday or if you just like my blog. If you want a blog button, scroll down the page to my labels and click blog buttons.
-You can read about me on my blogger profile. And the other blog I sometimes post at.
-You can look at my Yahoo avatar and click on it if you have Yahoo Mail and customise your own avatar.
- Every single post is archived so if you want to look at other posts you can.
- You can look at my labels and pick one. For example, if you are only looking for clothes for dolls than you click on the clothes for dolls label and you get every post about clothes for dolls.
- You can feed and brush my pet guinea pig, Butterscotch! Don't forget to turn up the sound Butterscotch squeaks! I made him from bunnyherolabs.com and you can adopt your very own virtual pet for your own blog or just save them in your favourites.(they even have llamas!)
- If you want to see how many people visit My Passions for Fashions each day than you can click on the s
Sitemeter button and take a look.
- If you like my blog than you can follow it!
- There is also a list of link partys to go to!

And on the posts you can: See other related post on my LinkWithin or comment on the post. Anyone can post a comment and you don't have to belong to blogger. I read every single comment because they are e-mailed to me so if you comment on a post from way back in March I will read it. Don't feel like leaving a comment? You can tell me if the post was: intresting, cool, or helpful. And when you click on comments it's a pop-up box so you can keep reading instead of having to go to a whole new page.
~~Ponytails
Thursday, May 27, 2010
Terrific Thrifty Thursday #7
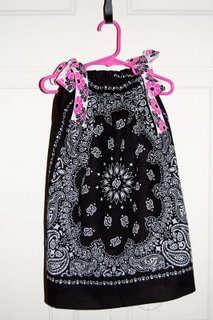
Welcome to the 7th edition of Terrific Thrifty Thursday! The first idea is for this bandanna dress from Trey and Lucy and they say that it can be used as a shirt too as your child gets older. This bandanna dress is a project to make for smaller people but it still is smart and easy! I'm not sure if a older person like a teenager could wear it as a shirt if the bandannas were big enough.

Second is this idea for a zipper flower cuff bracelet over at Something From Cassie. The way she makes the cuffs from old shirt sleeve cuffs would look cool enough without the zipper flowers as well!
Always, if you have been featured on a Terrific Thrifty Thursday then you can grab the Terrific Thrifty Thursday blog button for your blog. If you want to submit an idea to the next Terrific Thrifty Thursday send a frugal crafting, clothing, accessory, or easy cooking related project to: mypassionsforfashions (at) yahoo (dot) ca Also, thanks to Dollar Store Crafts for linking so many projects for me to look at for my Terrific Thrifty Thursdays!
~~Ponytails
Wednesday, May 26, 2010
Tip: Scarves

Today I have a tip for you about scarves. I recently learned this from a crochet book, this one. If you are making your own pattern for a scarf, knitting or crocheting and you don't know when it's long enough to stop, here is a tip. A good sized scarf should go from the tips on your fingers on one hand to the tips of the fingers on the other hand with your arms stretched out wide. Another way is to do that with a measuring tape and remember that measurement. I am about 150cm but, it's easier to just put your hands to the sides of you while holding the scarf.
~~Ponytails
~~Ponytails
Monday, May 24, 2010
Easy Microwave S'mores
This project is not really fashionable but it tastes good! This recipe is good if you don't want to make them because there are to many bugs outside, you don't have a barbeque, or you don't feel like making a bonfire! You can always change this recipe if you don't have some of the ingredients. (Example: you have graham crackers but not digestives)
To make easy s'mores you will need:
Chocolate Chips
Marshmallows (big or small)
Digestive Cookies (or graham crackers)
Plate
Microwave
Freezer

1. Put 2 cookies on you plate flat side up

2. Place a large marshmallow on one or you can use about 10 small ones.

3. Place about 10 chocolate chips on the other cookie.

4. Put it in the microwave for about thirty seconds (or until your marshmallow puffs up) and watch in amazement as your marshmallow turns from this,

to this!

5. Put the chocolate side on the marshmallow side and don't make all the marshmallow go out the sides.

6. Put it in the freezer for one minute or two minutes.

7. Take your s'more out of the freezer cut it in half with a butter knife if you like and eat your s'more!

I like this recipe and it doesn't take very long just make sure you wash your hands after because these are really sticky! ~~Ponytails
Edit: I was reading Stand in the Wind By Jean Little and these girls were having a camp-out and they made s'mores and spread peanut butter on them you can try that by spreading peanut butter on one of the cookies and sticking the chocolate chips to that side.
This recipe is copyright My Passions for Fashions 2010
Thursday, May 20, 2010
Terrific Thrifty Thursday #6

Next is this idea for a jewelry box with earring slots! I like this idea and you also find these kinds of boxes at Michael's and their flyer usually has a 40% off coupon so it won't cost much! I have one of these little boxes so maybe I will try it!
That's it for this Terrific Thrifty Thursday if you have an idea for Terrific Thirfty Thursday e-mail a easy cooking, crafty, accessory, or clothing related project or any kind of frugal craft to: mypassionsforfashions (at) yahoo (dot) ca If you have been featured on Terrific Thrifty Thursday you can grab a blog button for your blog!
Wednesday, May 19, 2010
Tip: Skirts

 Hello!
I am going to be having a few different tips and this is the first one. Are you having trouble making your skirts stay on their hangers? I thought of this and it is just so easy! Use three clothes pins! Maybe some people already do this but I always only used two and my skirts were always falling off their hangers! My skirts don't fall off their hangers very much anymore!
~~Ponytails
Monday, May 17, 2010
Wire Necklace!
Hello!

I was looking at a Mad Skills Link Party at Mad in Crafts and saw that there was this wire necklace. It is really easy to make and if you have the supplies it can cost you nothing! It looks like it would be a nice present for someone who likes necklaces and wants something different from those necklaces from the store! I think I'm going to have to try this sometime!
~~Ponytails

Saturday, May 15, 2010
Jacket Makeover and Pink Circle Scarf
Hello!


This week was my little sister's birthday and I decided that I would give her a couple pieces of clothing. Not from the store! It was much more fun to make them and my little sister had always admired my blue circle scarf. Another thing she had always liked was this navy blue fabric jacket not made out of jean but in a jean jacket style.
I made her a circle scarf out of a pink shirt I got from Michael's when the t-shirts were on sale and I gave her the jacket but I made some changes to it. I brought out my Crayola fabric markers and cut a star from some fabric and using a template. Those Crayola fabric markers are great and I only payed about a dollar at a yard sale for them! I thought of a few designs and settled on a "I Love Horses" design because she loves horses. I drew it and then ironed it to set the design.

Then I had to sew on the patch. I thought at first that I would sew it on the sewing machine but my Mom thought that it would be better if I sewed it by hand. I decided that I would put it on the pocket and I sewed it on. I had to kind of go in the pocket and then out because I wanted the pocket to be able to open.
That's was all I did besides clean the jacket first! My little sister really likes her scarf and jacket and I see her wear them all the time. She actually got a complement on the patch today. I love how the pink circle scarf turned out!
~~Ponytails


Friday, May 14, 2010
Finished Shorts (Clothes Design Class)
Hello! I finished the pair of shorts I talked about and here are the pictures. I cut the pair of jeans using a measuring tape to measure how long I wanted and a binder so I could get the line straight. Then I used Crayola fabric markers to make designs around the pockets and used an iron like the package says to set the designs. I made a sash and put dots on it and ironed that too. Then I used magenta thread and a straight stitch around the bottoms of the shorts so they would only fray up to the stitch. That was it! What do you think?


Thursday, May 13, 2010
Terrific Thrifty Thursday #5
Hello!
This is this week's edition of Terrific Thrifty Thursday! First up is this beach bag made out of two dish towels(new ones), two belts, a little bit of ribbon for decorations, and a sewing machine. You can find belts and dish towels at the dollar store.

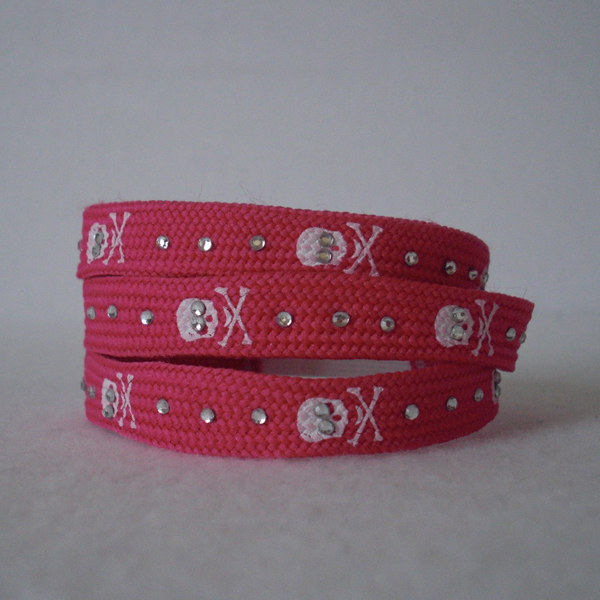
Next is this idea for shoelace bracelets! You can find lots of different patterned shoelaces at the dollar store. I think flowered shoelaces with rhinestone centers would be really cute!
That's it for this Terrific Thrifty Thursday. As always, if you were featured grab a button for your blog if you like. And if you have an awesome idea for Terrific Thrifty Thursday you can e-mail me an easy cooking, crafting, accessory, or clothes related project at: mypassionsforfashions at yahoo dot ca
~~Ponytails
Wednesday, May 12, 2010
Finished Shirt (Clothes Design Class)
Hello!
I finished the top I was working on last week that is made out of knit fabric and here are the pictures! I think it turned out great. I looks really good with a wide belt over it. My favourite part of making this was that I learned how to make patterns for tops.
I also made a smaller version for my Barbie because I had extra fabric. I know that I'm a tiny little bit old to play with Barbies but they make really good clothes models if you have an idea you want to try out but you don't want to use a whole lot of fabric. I also made a dress for my Barbie using the same idea from the shirt only making it long enough to be a dress.~~Ponytails


Tuesday, May 11, 2010
T-shirt into Belted Top Tutorial
 |
I have this one t-shirt that I got for my birthday last year and I love it! The decal on it is so funny and cute! But it got a little hole in it, so I couldn't wear it. :-(


 |
| The little black arrow shows where the hole is located. |
This is where the idea for this project started. I asked my older sister for advice about what I should do because you would normally just toss a shirt with a rip, but I loved this one! (And of course I wouldn't throw out a t-shirt! There is refashioning to be done!) My sister has good suggestions and I thought she could help. She said, "Well, you just make a hole in the other side so it will match!" I laughed because, well, she was being sarcastic. Thanks loads, Sis. "Wait! Hang on a second, that's a good idea!"
For this project you will need:
An old t-shirt with a hole near the side seam (if it's one near your waist or hips). If not, just an old t-shirt is fine.
Scissors
Ruler
Chalk, pencil, or fabric marker
A belt that looks nice with the t-shirt and fits well

1. If you do have a hole near the side seam, you don't need to make the mark. If you don't have a hole near the side seam put it on and make a mark on one side where you want the belt to sit (at your hips or waist). Then cut a very short slit. (Take the shirt off first!) If the shirt already has the slit/hole then skip this step. The picture below is showing that the hole is where the belt should sit.
 |
2. Use the ruler to help you make a mark directly across from the other hole. Then cut another slit.


3. Now beside each slit make another slit only on the other side of the seam creating a sort of loop. You can make the slits bigger, but starting the slits smaller is a good idea.

4. Put on the t-shirt, slide the belt through the loops, and buckle it.
You can make the slits longer if you need to. And if you make the slits to long then you can tuck a little bit of the slits under the belt.
5. Ta-da! Enjoy your new belted top! :)

I think it turned out nicely! If you had a really thick or a really thin belt you would just make the loops big enough to put the belt through. You could also do this on a t-shirt that needs something special. So if you just wanted to make a belted top you could make it with a t-shirt that had no rip in it in the first place. I also made the slits holes instead, but now I know that slits will work a little bit better. ;-) And who says you have to stick with one belt?

I love the little flower charm on this one:


Or maybe sparkles to glam it up:


Or maybe just a simple black belt:

-Ponytails
Monday, May 10, 2010

Subscribe to:
Posts (Atom)